Friday 31 October 2014

Vannessa - Shaped Shadow Box Tutorial with Trick or Treat

Good morning and Happy Hallowe'en! Hope you're all ready with your Jack O'Lanterns and candy for all the trick or treaters tonight! We have all our decorations ready to go up and our pumpkins carved. Just now need to wait for the doorbell to ring...

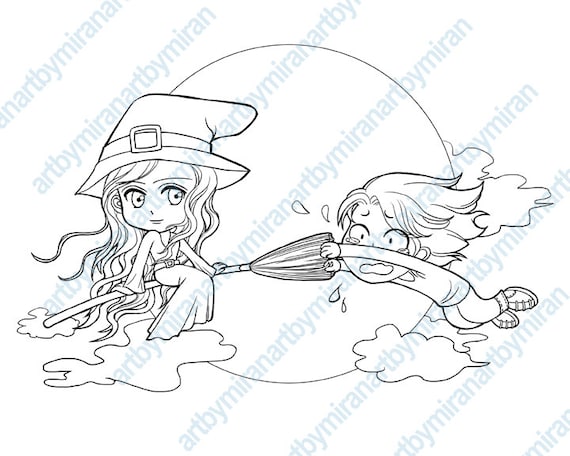
I thought today I would post a little tutorial for how I made one of my Hallowe'en decorations this year - a shadow box Hallowe'en scene with the gorgeous Trick or Treat from the Art by MiRan store. Perfect for tonight's festivities! This post is long and photo heavy so beware... and please excuse my messy crafting mat. It is heavily used!


1. Cut a base shape to the size you want using black card - mine is 7 inches wide. Cut the same size again for the top layer, but cut out the centre using a smaller size of the same shape. My smaller shape was 6.25 inches wide.


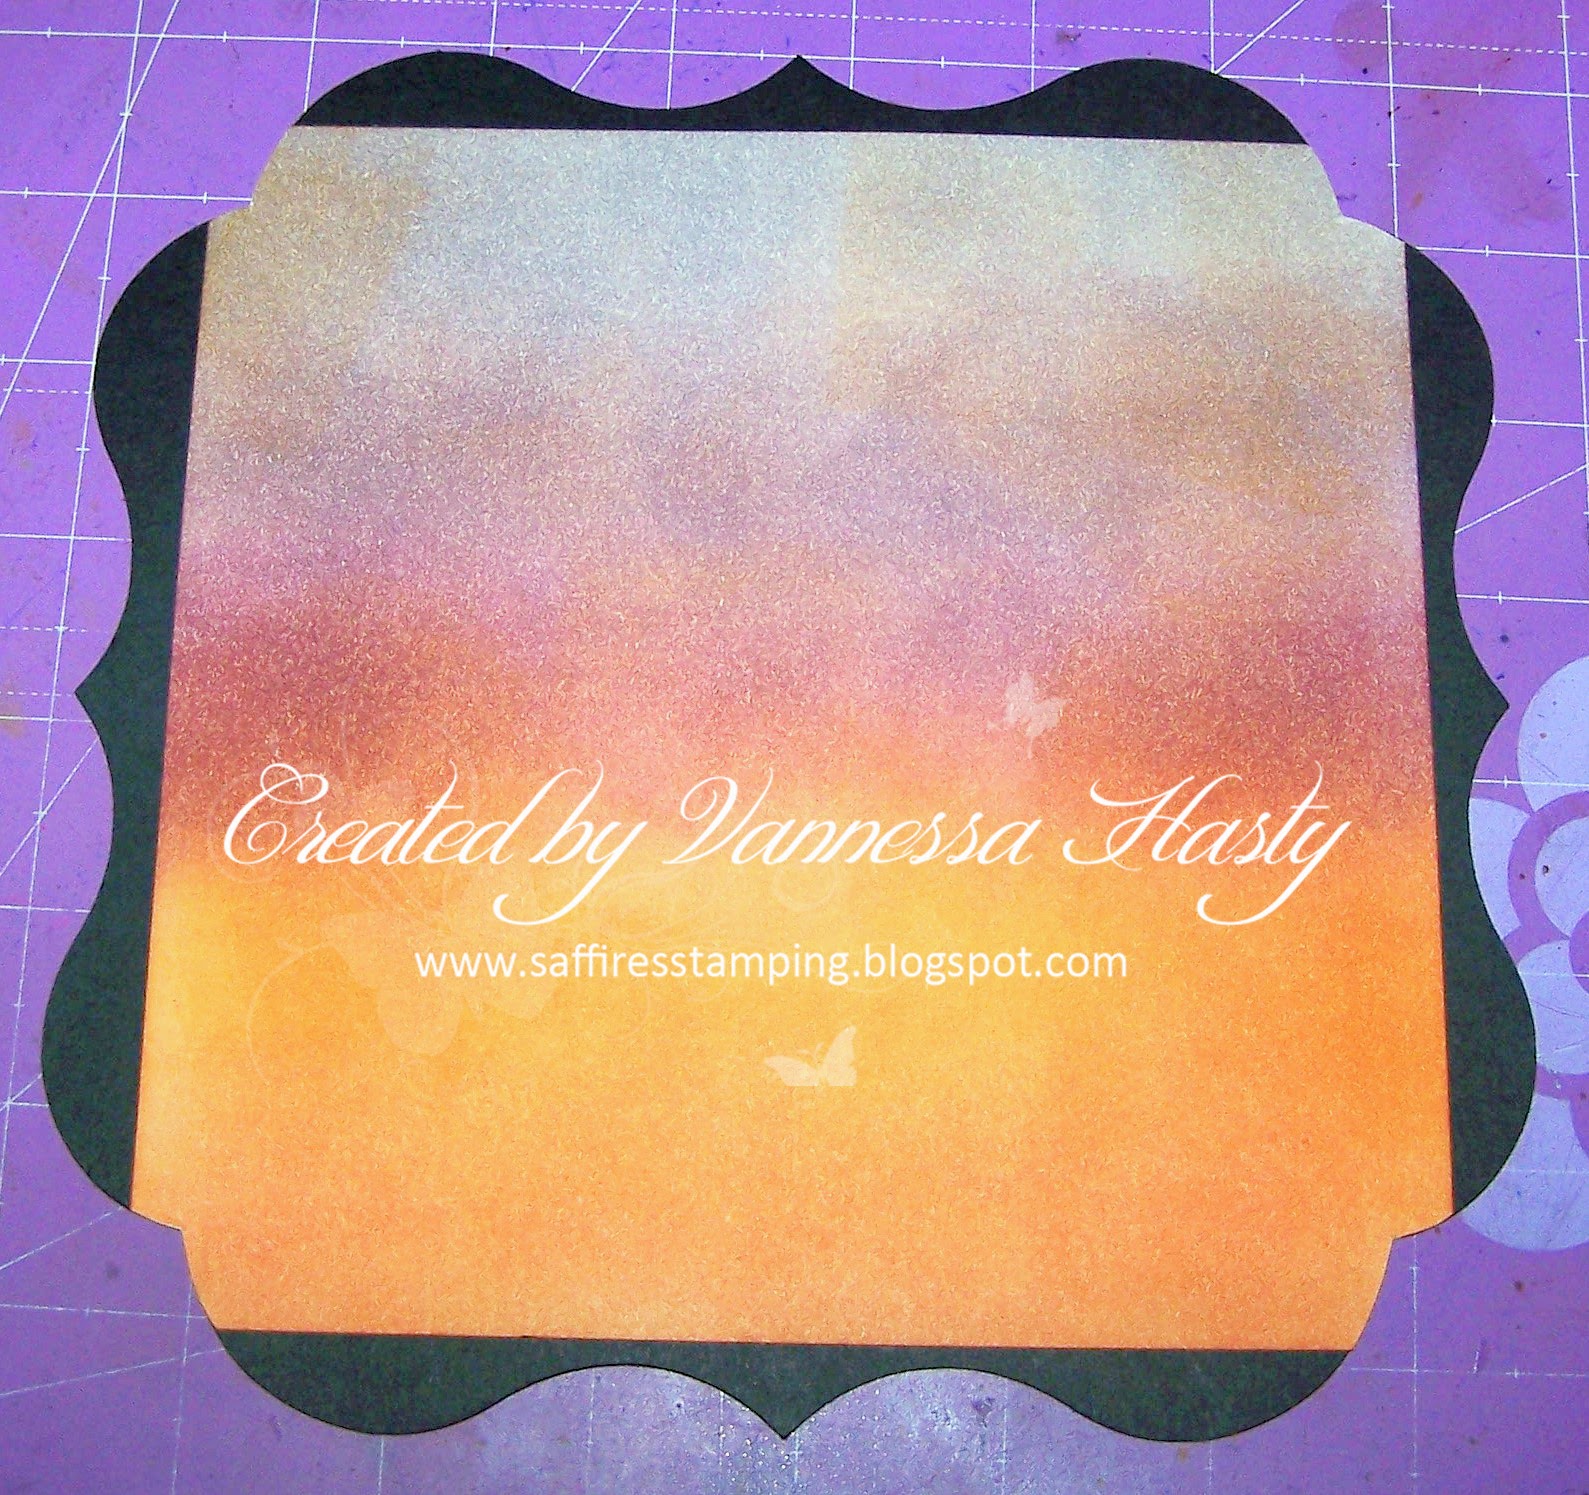
2. Cut a square of white card and ink it to make a dusky sunset. My square was 6.5 inches and I used 2 shades of orange and 3 shades of purple to create the night time sky background.


3. Glue your sky background to your base frame and trim off any excess in the corners. 

If you want to hang your frame you will need to add the holes/eyelets and ribbon at this stage. I opted for a standing frame so did not add these here.


4. Cut lots of pieces of foam tape and position them round the edge on the reverse side of your top frame. Depending on how high you want your frame or how thick your foam tape is, you will probably need more than one layer. I used 3 layers on mine to get the height I wanted.


5. Add your die cuts to make your silhouette scene and pop them up using foam pads/tape before adding the top frame. Trim off any excess from the edges of the frame.


6. Add your top frame over the top - I would recommend peeling the cover of your tape a side at a time, so you get the positioning correct. Decorate however you like. I added the Stickles dots at the end.

I glued the pumpkins over the top frame but added foam tape underneath where they hang over, so they remained upright. I only glued the banner where it touched the top frame to allow it to hang free.


7. Colour your Trick or Treat digi from Art by MiRan and attach to your frame. I printed her at 9cm high and used Copics in the following colours:

Skin - E000, E00, E21, E11, R20

Hair - V01, V04, V06, V09

Greens - YG61, YG63, YG67

Pumpkin - YR16, YR68, YR18, YR15

Broom - E31, E33, E35, E37

Stars - Golden Star Gelly Roll Pen

To make the frame stand up I used the centre piece cut out from the top frame, folded it in half and glued it to the back towards the bottom of the frame.


I hope you have enjoyed my little tutorial. This simple shadow box can be adapted for so many different occasions and I already have plans to make a Christmas themed one to add to my Christmas decorations! 

HAPPY HALLOWE'EN!

Hugs, Vannessa 

Thursday 30 October 2014

Irene - Elena

Good Thursday morning to you.
This is Irene and I am here to give you some
inspiration.
 
Today I chose to show you Elena.
Art By Mi Ran has soooo many wonderful images
that it is hard to chose just one to show you.
 
 
More details are on my blog.
 
Sure would love for you to join our facebook page if you haven't
and we have lots of challenges you could join in on. 


Tuesday 28 October 2014

Trick or Treat Witch Pumpkin Basket


Hi Jackie here today, sharing a one of Artbymiran's beautiful  image , another 
one that I love!'

Today I am sharing a Pumpkin Basket with Treat Or Treat Witch


You can find Trick Or Treat Witch here in the store 
we would love to see your take with her!

I hope you enjoyed my inspirational project...
Would love to have you visit my blog Papermoments ~ 
where I will share more details of my card.

Come on over and join the fun with our 
new challenge!! It is always ANYTHING GOES 

Hugs!! 
Jackie 

Monday 27 October 2014

Angelique - Midnight Ride

Goodmorning,

It's my turn again to host.
As I've already created and showed my fall colours project, I choose to make a halloween card.
Here in the Netherlands we do not realy celebrate halloween, which is a shame, as I LOVE halloween
I have used Midnight Ride for my project


I've created an easel card and kept it pretty simple.


As the image was a bit to wide for the easel card, I have removed the right part of the image.

A closer look att he image

She is coloured with pencils and the base layer of the broom is done with a flex marker

For more details on materials, please visit my blog: http://engeldesignsscrap.blogspot.nl/

I hope you enjoyed my inspirational project.
I would love for you to become a follower of our blog, along with visiting the shop to see als the wonderful images Artbymiran has to offer!

Don't forget to drop by our challenge blog for our current challenge:
Theme: Anything Goes

Thank you so much for dropping by.
Have a wonderfull day.


Sunday 26 October 2014

Irene - Halloween Heather

Hello there to all you Art By Mi Ran Fans.
Irene here to give you some inspiration.
 
Today I did a Halloween card for you.
I tried to do this one "not spooky" for those of
you that might have "little ones" who would love
to receive a card but may not want it too scarry.
 
This awesome digi is Halloween Heather .
Isn't she just fabulous !!!
 
Art by Mi Ran has many other Halloween images also
so be sure to go over there to her shop and check them all out.
 
 
For more details, go to my blog .

Come on over and join the fun with our 
new challenge!! It is always ANYTHING GOES !


Saturday 25 October 2014

Guest Designer - Caz Smith - 2nd creation

Good morning, it's time for the 2nd creation from 2nd Guest Designer for the month of October Caz Smith.

In case you missed her 1st post with us this month here's a little introduction for her.
My name is Caz. I live in Nottingham, England, with my very patient hubby Jim...Ive been card making now since 2010 after trying all sorts even bobbin lace making, love x stitch also, but this has been neglected ..I have 3 grown children, and 4 lovely grandchildren, ranging from 4 yrs up to 22yrs ..So lots of cards needed at times..lol..I also attend Phill Martins card classes, and have picked up a lot of tips..Our spare bedroom has become my craft room, so me upstairs and Jim downstairs..He is good and keeps me supplied with tea during the day. lol

So let's see her 2nd fabulous creation.  For this card she used the fabulous image Pretty Molly.

I really love those colors together!  It really makes Molly pop right out of the card!  You can see the details on how she made this card on her blog here.

I think you will agree with me that she did an awesome job showcasing this beautiful image. Thank you so much Caz for joining us as a GDT!!!!

We would love for you to become a follower of our blog along with visiting our shop to see all the wonderful images artbymiran has to offer! And of course you should go and check out our FB group there's so much fun going on there!!!

Thanks so much for stopping by and we Hope you have a Wonderful day!

Thursday 23 October 2014

New images - October

Good afternoon! It’s Mi Ran here 

I have some new images I wanted to share that I will be adding to my store ARTBYMIRAN


If you click the images, it will jump to store listing directly.


We have a artbymiran Facebook Page, where we offer Bi-Weekly Challenges. Come on over and join the FUN, chat with Mi Ran and the Design Team Members!

Thank you for stopping by and we Hope you have a Wonderful day!


Wednesday 22 October 2014

BOOKAHOLIC KAITE SAYS THANKS!


Good morning all, it's my turn to host the Artbymiran Blog today.
Today I would like to share a card I made using the fun digi image Bookaholic Kaite
The card was  a template from the Silhouette store, with some very slight adjustments and Kaite popped on the side.


You can find more details and photos on my blog: Little Pear Tree
  
We would love for you to become a follower of our blog, along with visiting our shop to see all the wonderful images Artbymiran  has to offer!

Thanks so much for stopping by and we Hope you have a Wonderful day!
Hugs
xxxxx


Cute a Sauras - Crafting Vicky

It's funny that both Tammy Louise and myself chose to play with the cute little image Cute A Sauras
Digital Stamp-Cute-a-sauras, Digi Stamp, Coloring page, Printable Line art for Card and Craft Supply
one day from another :)  And as you will see they are totally different looks!  She's such a little cutie and perfect right now for Halloween.  I used to love when my kids were younger and would dress up in those furry Halloween costumes!

Here's my card!
And here's a closer look at the cutie that I colored with copics.  If you want the details on how I made this card you should come here.
So what do you think?! Isn't she just the cutest?!?  Probably not too scary :)

We would love for you to become a follower of our blog, along with visiting our shop to see all the wonderful images Art by Mi Ran has to offer! And of course you should go and check out our FB group there's so much fun going on there!!!


Thanks so much for stopping by and we hope you have a wonderful day!

Hugs

Crafting Vicky

Tuesday 21 October 2014

Cute - A - Saurus Candy box


It's Tammy Louise here today on the MiRan inspiration blog to share a cute little Candy Box make!  Today's Halloween girl image is the ADORABLE long haired image called CUTE - A - SAURUS MiRan image!!

She is just too cute with her little nails painted pink and she's kicking up a cute little candy begging storm too!    I hope this inspires you to make a Halloween candy holder for your self?  

If you'd like to see a tutorial on the project, visit my YouTube channel here!


INGREDIENTS: 
Cute-A-Saurus digital image


 MEDIUMS: 
Copics used: skin E04,E21,E00,E000, RV32,RV34
Hair E08,19,29


More embellishments, information and pics can be found on my blog, so stop by for more here 
Thanks for Visiting,


Monday 20 October 2014

Coraline

Good morning Art by Mi Ran fans!

It's  Sandra here and it is my turn to host the Artbymiran Blog and today I would like to share a card I made with Coraline


When I am coloring people, I always love to do non-traditional hair colors. When I color, I always color her skin first. Then I look at the papers I want to use, and which colors are in it. This paperpad had a lot of purple in it, and that is why I decided to color her hair purple!


You can see more details on my blog Crea-Sandra

We would love for you to become a follower of our blog, along with visiting our shop to see all the wonderful images artbymiran has to offer!


Thanks so much for stopping by and we hope you have a wonderful day!

Hugs, Sandra

Saturday 18 October 2014

Guest Designer - Pauline Yates - 2nd creation

Good morning, it's time for the 2nd creation from our 1st Guest Designer for the month of October Pauline Yates.


In case you missed her 1st post with us this month here's a little introduction for her.

Hello, my name is Pauline Yates, and I live in Brisbane , sunny Queensland Australia. I have four adult children and eight grandchildren. I have been crafting for many years with everything ranging from, quilting, embroidery, paper tole , folk art, bear making and everything in between. However my card making is my main interest at this time and I just can’t get enough of it. I love to use all my creative juices on choosing papers, lace and die cuts to go with the images I want to colour. With the invention of digital stamps , it opens up a whole new world. I use copic markers most of the time , but have recently been trying out distress inks too. 

The second card I have made is one of my favourite cards ever.

So let's see her 2nd fabulous creation where she followed our theme the month Fall colors.  For this card she used the fabulous image Spring blush.
Here is a close up of flowers used.
She really made an adorable card with so many fun details. You can see the details on how she made this card on her blog here.

I think you will agree with me that she did an awesome job showcasing this beautiful image. We thank you very much Pauline for your time with us as a GDT!!!

We would love for you to become a follower of our blog along with visiting our shop to see all the wonderful images artbymiran has to offer! And of course you should go and check out our FB group there's so much fun going on there!!!

Thanks so much for stopping by and we Hope you have a Wonderful day!

Friday 17 October 2014

CELEBRATE THE SEASON

Good morning, its Desire  here and I hope you are all keeping well.


Our theme for October is FALL COLOURS.


This year is just flying by and before we know it, Christmas Day is upon us.  So I have been busy expanding my Christmas card stash.  This time I have used this cute little girl called SANTA'S HELPER created by the talented Mi Ran.  She really is so pretty and I am sure has been a very good girl to qualify as Santa's Helper.   Do yourself a favour and hop over to Mi Ran's Etsy shop and check out her awesome digi creations, here.  You can purchase SANTA'S HELPER here (in rubber format only) at Treasured Times Stamps.


Thanks so much for stopping by and we hope you will visit us again.

Creative Hugs

Thursday 16 October 2014

a letter for Santa

Good morning  everyone :)
It's  Anne here,  and it is my turn to host the Artbymiran blog. 
So I'll get right to it and I do hope you like my little bit of inspiration.
This is Letter to Santa and you'll find her over on Whimsy Stamps


All wrapped up and ready to post her letter :)

If you'd like some more  details on how I put this card together  then visit my blog.  
We would love for you to become a follower of our blog, along with visiting our shop to see all the wonderful images ArtbyMiran  has to offer!
There is also an Art by Miran Facebook page where we have monthly challenges and lots of crafty chatter. Why not pop over and have a natter with Miran and the DT girls

Thanks so much for stopping by and we hope you have a wonderful day!
Anne x

Wednesday 15 October 2014

Heartfelt Breast Cancer Awareness ...

Good morning! Ruza here, and its my turn to host the Art by Miran Blog


Today's card features the beautiful Heartfelt stamp that was created by
Mi Ran in Honor of Breast Cancer Awareness Month.


Copic Markers were used to color this beauty who I fussy
cut out and layered on my CAS design.

You can see more details about today's project on my blog
 ... Ruza's Craft Corner!

We have a Artbymiran Facebook Page, where we offer Monthly Challenges. 
Come on over and join the FUN, chat with Mi Ran and the Design Team Members! 

I hope that you'll pop on over to the Artbymiran Challenge Blog!
... where we host bi-weekly challenges ...

Thank you for stopping by and we Hope you have a Wonderful day!

Until next time ... Enjoy!